
If you are integrated with the WebPT EMR, and have received a rejection for an invalid diagnosis code, you will need to edit the diagnosis codes on the Patient's Case and the note for the rejected Date of Service (and all subsequent finalized notes) in the WebPT EMR before re-submitting the claim in Therabill.
- Edit Diagnosis codes on the Patient's Case in the EMR
- Complete an addendum on all affected Daily Notes. These diagnosis codes must be entered in the same order on the Daily Note and the Patient's chart in Therabill.
If you are not integrated with the WebPT EMR (Standalone) and receive a rejection for an invalid diagnosis code, update the session before resubmitting the claim. Adding or editing treatment diagnosis codes on a session requires two steps:
- Update the diagnosis code on the case.
- Update the diagnosis pointers on the session.
WebPT EMR - Update Patient's Case
- Navigate to the Patient's Chart.
- Locate the corresponding Case, then click Edit.
- Utilize the Up/Down arrows to re-order codes.Note: If needed, you can also add new codes and/or remove codes.
- Click Ok, then Save Patient to finalize changes.
WebPT EMR Integrated Members - SOAP 1.0
Follow these steps if you are integrated with the WebPT EMR - SOAP 1.0.
- From the patient record, locate the corresponding Daily Note and use the drop-down to select Add Addendum.
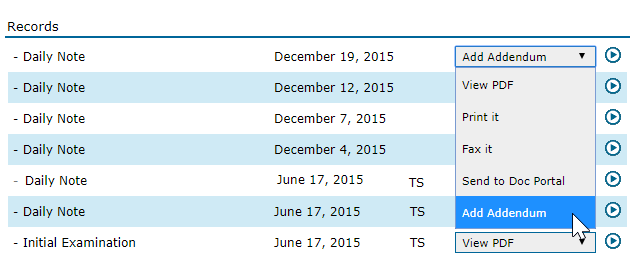
- Click the play button.

-
On the Subjective tab, update the Diagnosis and Treatment Diagnosis codes to reflect with the order in Therabill.
- Click Finalize, Finalize & Rebill, or Forward it for a co-signature. Once finalized, the Addendum will be available in the patient record.
WebPT EMR Integrated Members - SOAP 2.0
Follow these steps if you are integrated with the WebPT EMR - SOAP 2.0.
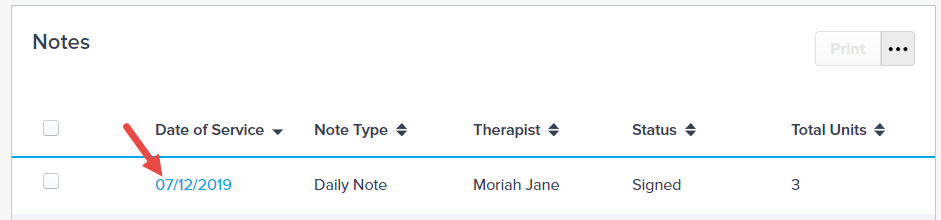
- From the patient’s Record, open the note by selecting the Date of Service.
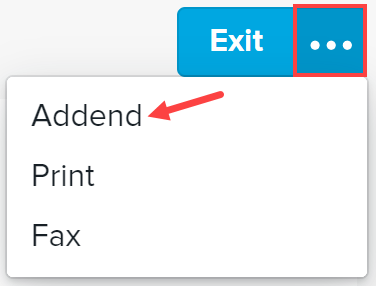
- Click the (1) ellipses (...) and select (2) Addend.
- Click into the Assessment Section to update the Medical Diagnosis and Treating Diagnosis.
- You can use the (...) to Move Up/Move Down in order to manually re-order codes.
- Click Done at the bottom of the subsection when complete.
- Once your changes are complete, click Sign.

- You will be prompted to enter a (1) Addendum Reason, determine whether you want to (2) Re-bill for this visit (billing integrations only), and click (3) Apply.
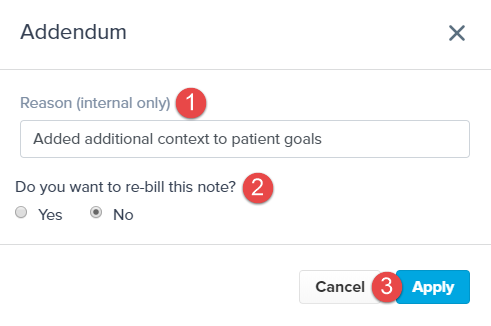
Note: The reason entered is internal only and will not be visible on the documentation shared with referring physicians or in your billing software.
Standalone Members
Follow these steps if you are not integrated with the WebPT EMR.
A. Update Case
To select a diagnosis code on a session, the case must first be updated.
- Navigate to Clients > Client List.
- Locate the desired client and edit their chart using the icon.
-
Under the Diagnosis (Cases) section, use the icon to edit the case.
- Enter or edit up to 12 diagnosis code(s) under the ICD-9 or ICD-10 column.
- Click Update.
B. Update Session
After the case diagnoses have been updated:
- Navigate to Schedule > Search Sessions.
- Locate the session using filters, if needed.
-
Edit the session using the corresponding icon.
- If your session has multiple codes, edit the code using the icon; otherwise, skip to step 5.
-
In the Treatment Dx box, select the
icon.
- Select up to four ICD-9 or ICD-10 codes for the CPT code.
- Save your selection and the service code.
- Repeat steps 4-7 until all applicable codes have been updated.
- Click Save & Done.
Comments
0 comments
Article is closed for comments.