Note: If you are integrated with WebPT, sessions will be automatically created by a Daily Note.
A session correlates to a visit that you had with a client and contains charges for services rendered. This can include an evaluation, a follow-up visit, and even a discharge visit. Sessions can also be used to record supplies that were purchased from your clinic.
Open Add Session Window
To access the Add Session window, you can:
- Select the
 icon from the toolbox on the left-hand side of the application
 - Navigate to Clients > Client List and select the
 icon on the desired client
 - On the Dashboard, click the
 button
 - Navigate to Schedule > Calendar and select a time slot on the schedule
Add Session Information
The session window is separated into 2 sections:
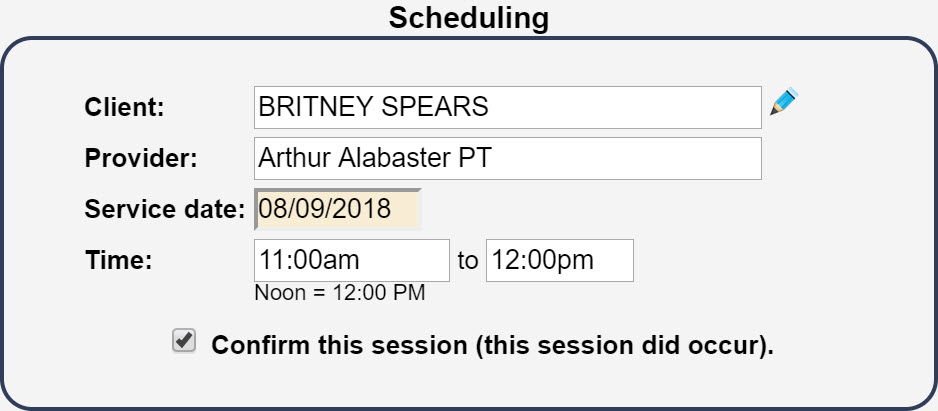
Scheduling
- Client: Enter the client's name and select them from the drop-down list.
- Provider: Enter the rendering provider's name and select them from the drop-down list.
- Service Date: Enter the date on which the client was seen or the supplies were purchased.
- Time (Standalone Only): Enter the start time and end time of the visit. This is used for the scheduling feature and does not affect timed CPT codes.
- Confirm This Session: Check this box to indicate that the services were already rendered or the supplies were already purchased. This option can be turned on/off under Admin > Defaults/Settings > Schedule.
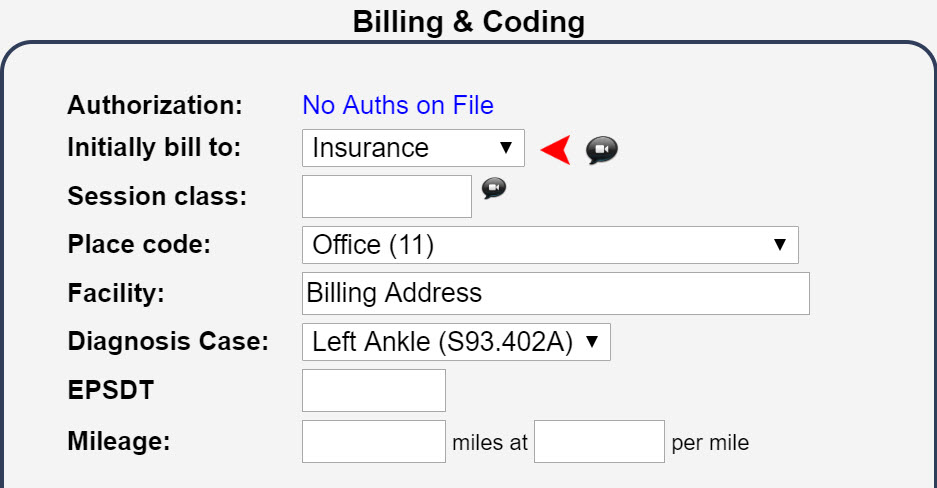
Billing & Coding

- Authorization: Manually attach an insurance authorization to be included on a claim. For more information, please see: Authorizations.
- Initially Bill To: Indicate whether this session will be first billed to an insurance or straight to the client. Any client listed as Self Pay will default to Client/Patient.
- Session Class: For information on session classes, please see: Session Class.
- Place Code: From the drop-down list, choose the appropriate code for the Place of Service.
- Facility: If the Place Code is set to a facility location (i.e. Office or School), this option will appear. Enter the facility's name and select it from the drop-down list.
- Diagnosis Case: Use the drop-down list to select the appropriate case.
- EPSDT (Rare): If the client qualifies for the Early Periodic Screening, Diagnosis, and Treatment Program, enter the corresponding codes.
- Mileage: Enter the milage that the provider traveled for the session for non-office visits. This is for your own personal records and can be used for reporting.

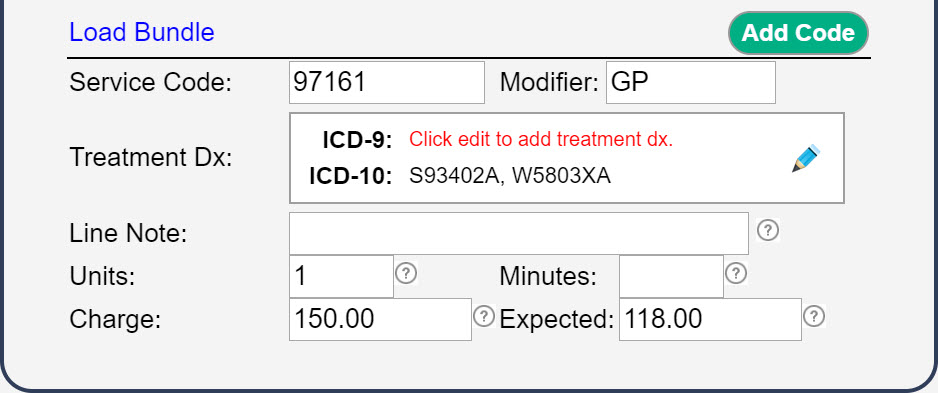
Use the bottom half of the Billing & Coding section to enter information about the service codes. After you the first service code has been entered, you can add additional codes by selecting the Add Code button.
- Service Code: Enter a valid CPT code if you are billing insurance. You can also enter a custom code that was created for supplies or various fees.
- Modifier: If the payer requires a modifier associated with this Service Code, enter it here. Multiple modifiers should be separated by a period (i.e. GP.KX).
- Treatment Dx: Use the
 icon to select up to 4 diagnosis codes the service corresponds with.
 - Line Note: If the Service Code is considered to be non-specific, enter additional details here. Entering information into this field for other codes may result in a rejection.
- Units: Enter the number of units. For more information, please see: Units - Add/Edit Session
- Minutes (Standalone Only): Enter the number of minutes the service was performed.
- Charge: The amount will auto-populate using your Fee Schedule based on the Service Code, Modifier(s), and Units/Minutes fields. You also have the ability to manually change the amount. For more information, please see: CPT Fee Schedule.
- Expected: This optional field will auto-populate an amount using your Expected Rates Schedule based on the Service Code, Modifier(s), and Units/Minutes fields. You also have the ability to manually change the amount. For more information, please see: Expected Rates Schedule.
Note: If you have entered multiple codes, you can reorder them manually by using the drop-and-drop method. Additionally, you can take advantage of CPT Auto-Ordering to display the code with the highest expected reimbursement first. For more information, please see: CPT Auto-Ordering. 
Save Session

Once you have filled out the form, click the appropriate save button.
- Save & Edit: The session will be saved and the window will remain. This will allow you to make further changes to the current session.
- Save & New: The session will be saved and a blank form will appear. This is useful if you need to add multiple sessions.
- Save & Done: The session will be saved and the window will close.


Comments
0 comments
Article is closed for comments.