The Expected Rates Schedule allows you to enter the amount you expect to receive from each payer.
When a session is added, the system will generate the expected rate for each code based on the insurance company, the plan/program on the corresponding insurance card, and the CPT code and modifier. You can create an expected rates schedule for each of your insurance companies and even for specific plans within that payer.
This feature is optional and primarily used for reporting. However, you will want to fill out your Expected Rates Schedule if you plan on using CPT Auto-Ordering to maximize on your reimbursement.
For more information on how the schedule is incorporated throughout the system, please see: Expected Rates.
IMPORTANT: Your Expected Rates Schedule is not the same as your CPT Fee Schedule. This schedule displays the amounts that you expect to be paid, while your CPT Fee Schedule lists the amounts you bill to each payer.
The Expected Rates Schedule
To access this schedule, navigate to Admin > Defaults/Settings > Expected Rates. You will see a table with CPT codes as rows and Session Classes (if any) as columns. Session classes can be set up using Schedule > Classes.
Note: For WebPT integrated members, all sessions will generate without a class unless one is specified on the client's chart. Sessions without a class will use the Default column.

Before we get into creating your expected rates schedule, let's go over some of the features on this screen.
Filters
At the top left of the screen, you can use the Insurance/Payer drop-down to create a schedule for a specific insurance. The Default schedule will apply to all insurance companies who do not have their own schedule set up.
Note: The insurance companies listed in the drop-down menu are pulled from insurance companies that you have entered on insurance cards within Therabill.
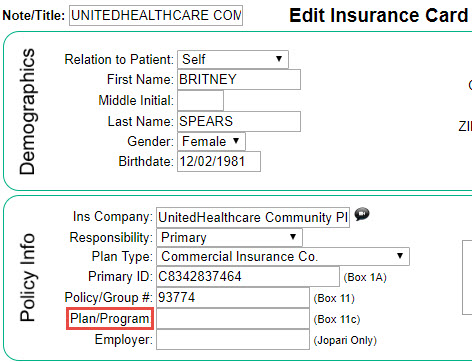
If you have entered text into the Plan/Program field on any insurance cards, you can use the Plan drop-down to create an even more specific schedule. The available plans in the drop-down list are insurance-specific.
Add Service Code, Class Column, Delete Schedule
Whenever you enter a code into your CPT Fee Schedule, it is automatically added to your Expected Rates Schedule. However, you can manually add codes to this schedule by clicking Service/Row. If you want to add modifiers, that can be done at a later time.
Adding a Class/Column is the equivalent of adding a new session class under Schedule > Classes.
If you no longer want to use the schedule or you want to redo the entire schedule, you can click Delete This Expected Rates Schedule. This will only remove the current schedule you have selected using the Insurance and Plan.

Creating Your Expected Rates Schedule
- Click on the cell that corresponds to the CPT Code and Session Class desired. This will expand that field. The top of the expanded area will display the Code and Class for that cell.
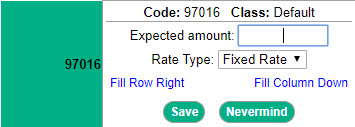
- Enter the Expected amount. The Expected amount is the numerical amount that you expect to be reimbursed (based on the rate type). The Rate Type options you have are Fixed Rate, Per Unit, or Per Minute.
- Fixed Rate - This means you are expecting to receive a flat amount, regardless of how many units you bill.
- Per Unit - Indicates the amount you expect to receive based on the specified number of units. For example, if you expect to receive $50 for every unit you bill, you would enter 50 as the amount, set the RateType as Per Unit, and specify 1 unit.
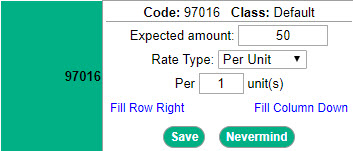
- Per Minute (Non-integrated clinics) - If you enter minutes on your session, you can indicate the amount you expect to receive based on a specified number of minutes.
- Click Save.
Filling Columns and Rows
You will notice that when entering the rates, there are 2 links you can click. One link is labeled Fill Row Right and the other is labeled Fill Column Down. You can use these links to take what you have entered and apply it to everything in the row to the right or everything in the column below.
Different Expected Rates for a Service Code Modifier
If you expect a different reimbursement amount when a modifier is used then you will need to do a Modifier Split.
- When you put your mouse over the row, a
 icon
icon  will appear to the left of the row. Click on that split icon.
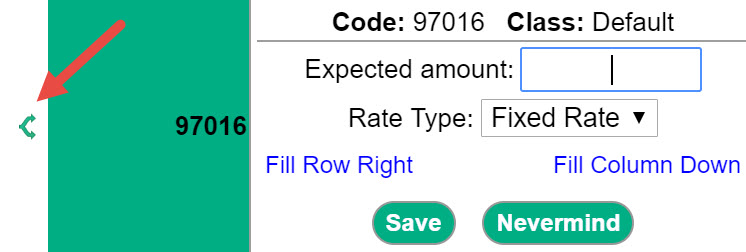
- On the Add Modifier to CPT box, enter the modifier that you wish to add to the CPT code. If you would like to add multiple modifiers, separate them using a period. Do not enter the CPT as part of the modifier.
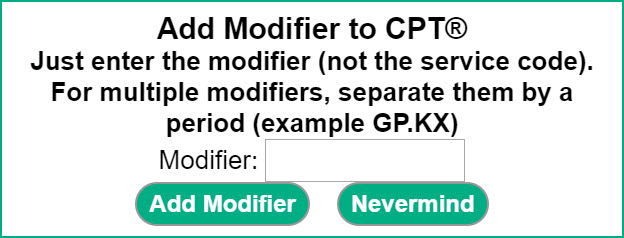
- Click Add Modifier. This will create a new line on the schedule.
I have multiple Expected Rate Schedules. Which one does the system use?
The system uses a hierarchy to determine the order of codes on a session from the most specific to least specific. If the system does not find an expected rate in the first schedule, it will search the second, and then the third. If no expected rate is found for a code, it will be treated as a 0.00 value.
- Specific Payer/Specific Plan

- Specific Payer/Default Plan

- Default Payer/Default Plan


Comments
0 comments
Article is closed for comments.