The application offers the Ledger Statement as a way to bill your clients. For more detailed statements, use the recommended method: Client Balance Statements. The main difference between the two statements is formatting. The ledger lists charges and payments in a chronological order, like a checkbook. Ledger Statements can be created for single clients or batched.
For more information, please see: What is the difference between a client's Ledger Balance and Statement Balance?
Create a Ledger Statement (Single Client)
- Navigate to Billing > Bill Client > Ledger Statement.
- If desired, change the Date range or use a Date Preset.
- Enter a name into the Client field and select the client from the drop-down list. A list of charges and payments will be displayed. If there were charges or payments prior to the Date range, there will be a line for Previous balance.

- Click Print.
Print the Ledger Statement
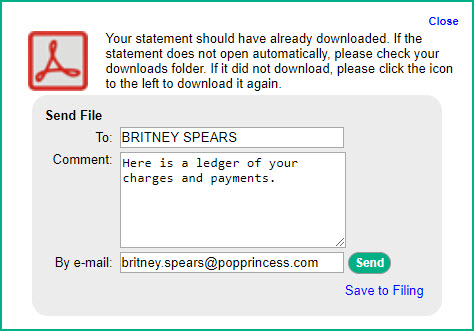
When you select Print, the system will create a PDF document and download it to your computer. A new window will appear allowing you to re-download the file or email the document with a custom message.

Save to Filing
Clicking this link after the statement is created will save a copy to Filing > Client Filing > Statements. If you are using the Client Portal add-on, you must click this link to post the statement to the portal.
For more information, please see: Client Portal.
Create a Ledger Statement (Batch)
- Navigate to Billing > Bill Client > Ledger Statement.
- If desired, change the Date range or use a Date Preset.
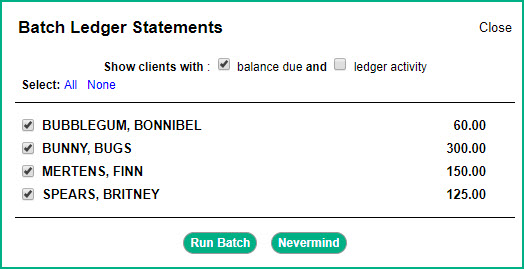
- Select Batch. A new window will appear.

- Use the Show clients with checkboxes to display clients with a balance due, ledger activity, or both.
- Deselect any client you do not want to create a statement for.
- Select Run Batch.
Print the Ledger Statement
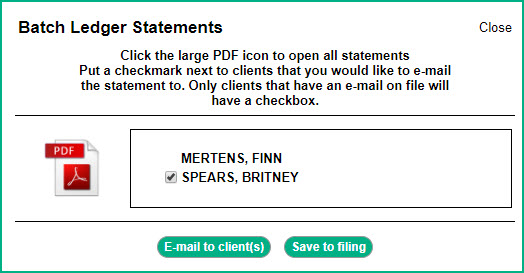
When you select Print, the system will create a PDF document and download it to your computer. A new window will appear allowing you to re-download the file or email the documents. Clients with an email address on file will have a checkbox next to their name.

Save to filing
Clicking this button after the statement is created will save a copy to Filing > Client Filing > Statements. If you are using the Client Portal add-on, you must click this link to post the statement to the portal.
For more information, please see: Client Portal.

Comments
0 comments
Article is closed for comments.